Tom’s Hardware has a longer review article on background and multiple options. This focuses on a simple method users can do.
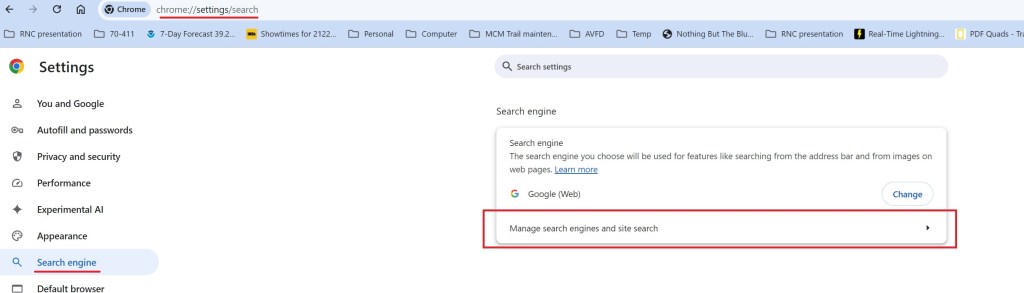
Open Chrome and go to the settings/search page. Select search engine then select Manage search engines.
The screen changes to listing the search engines and site. Add a site to search
I named it Google(Web) to match the tabs on search results. The shortcut needs to be google.com. If you enter it with the www prefix, it will not work. The critical entry is the URL: {google:baseURL}/search?udm=14&q=%s
This returns web results only, not the added AI or other summary features. Note URL in search bar and the Web tab selection in the return.
However it you want or are expecting summary graphics, just select All and summary is added without AI (so far, that might change).
Background. Laptop with failed motherboard, no backup. User needed to recover a functional program to export data to new machine. System was Windows 11 home edition.
Turns out, it’s very easy to do as long as the user can recover the Bitlocker key from their MS account. Recovery cannot be done until the drive is unlocked and decrypted.
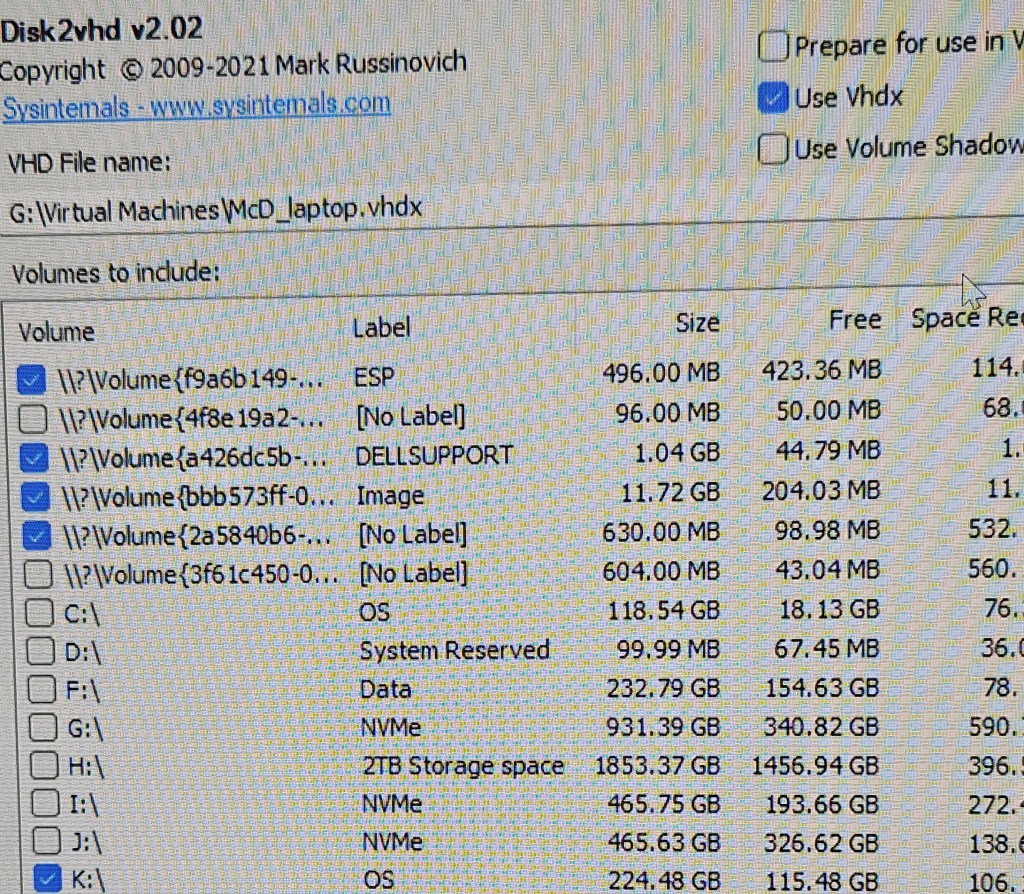
Use the disk2vhd utility from sysinternals to create the VHD from the drive. There is one problem not apparent until you actually mount the drive and start the process. There are system areas on the drive which also need to be copied to the same VHD but can be a pain to pick them out on the menu.
Easiest way to do the job is run the utility without the mounted external drive and get a list of all segments that exist in the machine doing the copying. Then exit the program, mount the disk to be copied and select all new entries.
Baseline
Select all new entries.
Once the VHD is created, open Hyper-V manager and create a new disk, gen-2 and mount the VHD as the drive. Select the new VM and start. The VM manager will install the needed drivers to fully boot the machine in Hyper-V. Patience. The pin login will be lost but the user can login using their MS account.
Until the VM is activated by the user login, the VM cannot be properly exported to create additional machines. The export function will work and create a file but it will fail on any attempt to restore it to any location.
Problem: USB drive formatted for use with an Ubuntu machine. I wanted to format the USB for reuse on a Windows 11 computer. One windows system would not mount the USB device and give an error message that the device needed to be formatted, however, any attempt at format failed. Should also note the device size was listed as unknown in the format wizard.
Earlier and on a different windows box, the USB device would mount but could not be formatted giving an error message that the device was read only. Made several attempts with different solutions found online but none worked. After these attempts, the other machine would not mount the drive.
After a lot of trial and error, it came down to 3 methods most likely to force a format: a registry edit, use diskpart to remove read only status and diskpart to format the drive. There are a couple of others which remove read only status: mechanical switch or disk properties available in windows explorer, but it the drive won’t mount, windows explorer is useless.
For the registry, you need to create a key. Computer\HKEY_LOCAL_MACHINE\SYSTEM\CurrentControlSet\Control\StorageDevicePolicies create a value in the key: writeprotect DWORD(32-bit) and set it to 0. This went smoothly but the USB still failed to format. Probably because the USB drive would not mount. Still got an error of unknown disk size in the formatting wizard.
DISKPART would recognize the device and list the size. So tried removing the read only property. Run DISKPART > list disk > select disk # > attributes disk clear readonly It returned success. However, still could not mount or format the disk. Same error message in the wizard box – unknown disk size.
Since DISKPART would recognize and determine the size, I then chose to format the disk directly in DISKPART. Run DISKPART > list disk > select disk # > clean > create partition primary > format fs=ntfs This is a full format, not a quick format, and is slow. Patience required to even see the first 1%. When the format is complete, windows explorer opens focused on the USB device. If the message in the formatting wizard is disk of unknown size, start with this.
Left unfettered, the disk journal files can consume multiple GB of disk space. In mini systems with smaller SSDs this can lead to warnings that the disk is running out of space.
To find amount of disk space in use: journalctl –disk-usage Sudo is not needed
If you decide to delete journal files, first close and archive all active journal files: sudo journalctl –rotate
You can delete log files by age, disk space used or number of files to remain: sudo journalctl –vacuum-size=150M leaves 150MB of journal files sudo journalctl –vacuum-files=6 leaves 6 files sudo journalctl –vacuum-time=3days leaves the last 3 days of files
The amount of space taken up by journal files can be limited by editing the journald.conf file: sudo gedit /etc/systemd/journald.conf Uncomment line 25 SystemMaxUse and set a value. SystemMaxUse=150M A different editor is used in Ubuntu 23.04 but the configurations are the same.
Reload the configuration sudo systemctl restart systemd-journald
Briefly an LED control program that can be installed on the 2 mentioned chips. Covered in many articles and YouTube videos. This is just a brief overview and mention of some specific problems encountered not otherwise well documented.
The most common method of installation is to use the WLED web site while the chip is connected to the computer via USB port. For the most part, this goes smoothly and the prompts will guide you to serial port drivers if any are needed and then configure wireless network connections.
For ESP32 chips, hold down the EN button before you connect and release it once the installation starts. I’ve seen posts and videos stating use the boot button. That also works but you have to be sure to hold it until it says erasing, not just installing.
Specific to the NodeMCU ESP8266, it may require you to download and install the CH340 driver before it can connect over the serial port. A reboot was not needed. There are other sources on line of the same driver but some don’t work. Other chips may require a different port driver or not need a driver. To get to the drivers, just select “No device found” on item 2. Apple laptop security won’t permit this file to install but, so far, it hasn’t been necessary to add it, the Apple laptop natively supported the chip connection. Twice I’ve had a Windows computer require the driver to be reinstalled after an update and reboot.
Once WLED is installed, you can set up a local wi-fi access point under config>wifi setup > scroll down to “configure access point”. For the access point to be available, select “Always” in the “AP opens” box. It shows as WLED-AP as default name in the list of wireless connection points. From here it gets a little confusing. Select it as your wi-fi service. If you are using an Android phone and the chip is connected via USB to a computer, when you select sign-in, no password is needed even if you set one. The sign-in dumps you directly into the control page. If the chip is not connected to a computer, a sign-in with password is needed. The default password is “wled1234”
Some cases I prefer to use only the WLED-AP for unit control. There is no encryption on passwords saved on the chip. If the unit is outside, it’s possible for someone to get the users home wi-fi password and SSID if the unit is stolen.
The WLED app works to connect to the chip on the same subnet. I have not had success in connecting across subnets. Even on the same subnet, the discover process may not work. Easiest to just enter the IP address taken from the “wifi setup” on the configuration page when you initially set up the access point.
There are other installers which can be used to install the binary and configure the wireless network later. I’ve used this when I want to have only the user’s wireless network configured on the chip since the password is stored unencrypted in the EEPROM or I want a different program installed. ESPEasyFlasher is specific for the ESP8266. Download the WLED binary and flash the chip. Exspressif has others for the ESP32 WLED. There is also ESPhome-flasher. Deprecated on Jul 3, 2023 but still good for this. Advantage of no fiddling with buttons and it will install any binary file, not limited to WLED.
The problem is created by having the enhanced view active in the Hyper-V connection to the VM. This may express several ways and may not occur in all situations. Does happen in Hyper-V consoles on Windows 10, 11, server 2019 and probably other server versions. In some cases there will be no enhanced view option available and there is no issue. In other cases, the option has to be deselected every time. This is new behavior as it started with VMs that have been working without a problem.
Image of login screen when enhanced session is enabled. This happens when you do a Quick Create. When you complete the login, there is just a blank screen. Other times, with existing VMs, you may get normal login screen that fails with a blank screen – next image.
Image of login screen when enhanced view is off. This will be successful. Sometimes you may get this screen with the Enhanced Session checked and it will go to a blank screen on login. Notice the option cannot be checked in this instance.
Problem setup. Using a built-in FTP client on commercial software to transfer log files to another location. The VSFTPD server was configured on a Raspberry Pi 3 with a 1TB HDD connected by USB. Configuration was tested with FileZilla and everything worked as expected. However, the client was unable to connect despite trying numerous configurations in accordance with the documentation. To make matters more confusing, the client could connect to a Windows native FTP server configured in Windows 10.
Cut to the chase. The client was not well written which resulted in multiple errors in communication, any one of which would cause the communication to fail. The auth.log was not helpful because all of the errors generated the same message. The result was, if you correct the first error, the second error in sequence generated the same error message so you are stuck thinking you haven’t fixed the first error. Wireshark capture of the packet exchange makes clear what’s going on by showing full error messages in context.
The client did not have any encryption or security function whatsoever. It took a few tries before I realized this and configured the server to expect an unencrypted login. However, this did not fix the login problem so I fired up Wireshark to see what was on the wire.
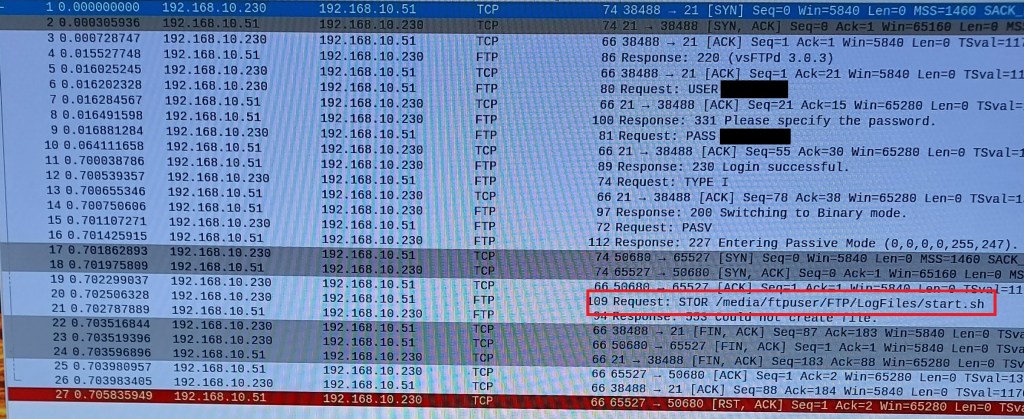
First problem, the client was not passing a correct password to the server. Here it was fortunate that there was no encryption. Turns out that the client did not properly parse the input, choked and spat out random garbage if a $ was included in the password. It may have problems with other special characters but I didn’t check those. I had used a different account with the Windows FTP and no special characters were included. Password indicated in the figure was not what was entered thru the keyboard.
The next problem was the client would only work in passive mode. Not much of a problem but it required the IP address of the client to be included in the /etc/vsftpd.conf file on the server. This was missed in online example configuration files I was using as a guide. It did not have this problem with the Windows FTP server. pasv_address=192.168.10.230
Final problem. The client ignored the local_root setting in VSFTPD.CONF for the working file directory. It had to be entered on the client side. Windows FTP was OK with the default from the client but VSFTPD was not. Shown in figure. The password has been accepted and communication switched to passive mode but the STOR command fails because the directory requested is not the directory configured by VSFTPD. The auth.log records the same error message as for the first 2 failures. It is an authorization failure but at a different point in the process.
Summary. Just because a well known and widely used software system has an FTP client module, you cannot assume the FTP client is well written.
If the Ubuntu box is active directory domain joined for user authentication, the domain users cannot authenticate without changes to the sssd.conf file. sudo -i cd /etc/sssd nano sssd.conf add 3 lines case_sensitive = False ad_gpo_access_control = enforcing ad_gpo_map_remote_interactive = +xrdp-sesman
restart sssd systemctl restart sssd
For domain user name use the full domain in this format. user@nameof.domain
There are a bunch of settings in Win10/11 that need to be modified to connect to an EdgeRouter X which were covered in individual prior posts. I just had to setup 2 more machines and realized I need to collect them in one post. Here they are without background reference which can be found in earlier posts.
Problem
Just switched from Verizon to T-Mobile 5G internet connection and the VPN fails. Other users have Comcast or Verizon 5G and there is no problem. After a year of trying, T-mobile 5G does not permit user to make changes necessary to get it working.
Create VPN connection
In VPN properties, select Security tab. Under Allow These protocols, check CHAP and MS-CHAP v2
Also important, in the VPN properties, enter the domain suffix to use. If you don’t, the VPN will connect but get all sorts of errors. The telling one is if you try to browse a remote file, you get an error message stating you are not allowed to login from this location. Also, remote desktop connects to target but then quits instead of logging in.
Turn off UDP for client From command line as administrator or PowerShell as administrator run the following
Registry edit for Windows firewall REG ADD HKLM\SYSTEM\CurrentControlSet\Services\PolicyAgent /v AssumeUDPEncapsulationContextOnSendRule /t REG_DWORD /d 0x2 /f
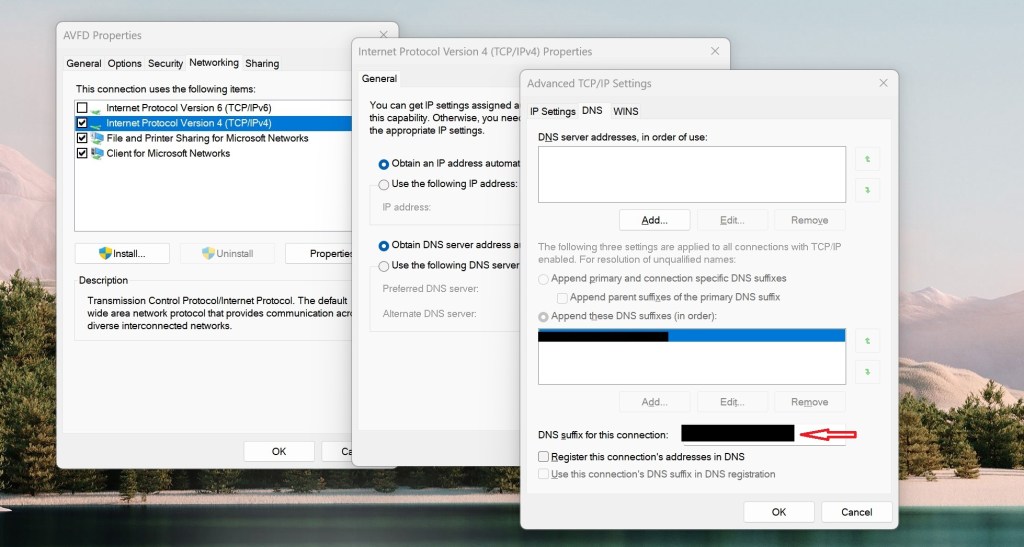
Add FQDN for remote DNS lookup Search for and open Control Panel > Network and Sharing Center >Change Adapter Settings > select Ethernet connection (not VPN) & right click > select properties > select IPV4 > select properties > select advanced button > select DNS tab > select button ‘Append these DNS suffixes’ > select Add > enter the correct suffix for the remote domain.
Remote Gateway In the VPN network connection, under properties select the Networking tab, select IPv4 properties. General tab appears, select advanced, on IP settings make sure Use Default Gateway on Remote Network is checked. If unchecked it can cause DNS lookup problems to the remote computers depending on priority settings of the VPN vs. Ethernet connections. If you can find them by IP address but not name with this unchecked, priority settings are the issue. Split tunneling is the same as unchecking this box.
Set split tunneling Get-VPNConnection Look for SplitTunneling status: false by default Set-VPNConnection -Name “VPNname” -SplitTunneling $True Quotes around VPN name are required
If split tunneling is true, the remote gateway is not set. This causes problems with finding the remote computers. You can find them by IP address but not name. The fix for this while keeping split tunneling is to reduce the priority number for the VPN and increase it for the Ethernet connection. This forces name resolution to use the VPN DNS first then the external DNS if it can’t find the name locally. It works for browsing external web sites but seems to have occasional difficulty with ads on some pages slowing the response or failing to finish loading.
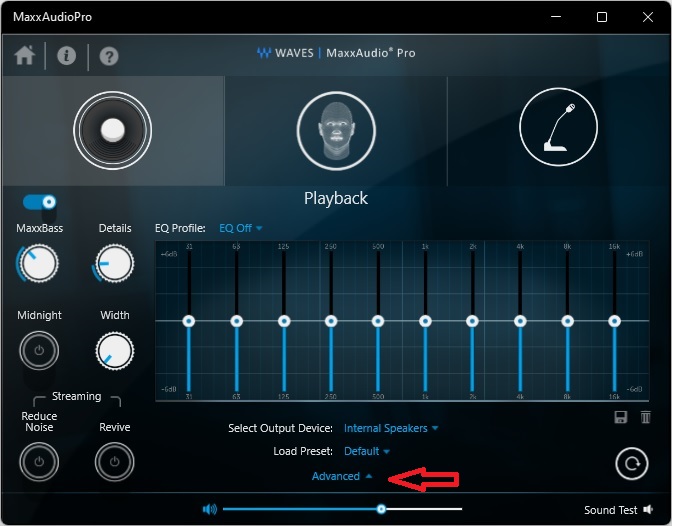
This was a head scratcher. Headphones stopped being detected when plugged into the front panel jack and audio output was only to the internal speakers. Long story short, a checkbox on the MaxxAudioPro utility had become unchecked.
Went thru the usual settings to check listed on many, many web pages and got nowhere. Sound in the control panel, sound settings, audio mixer, ran the audio troubleshooter, updated drivers, etc., all to no effect.
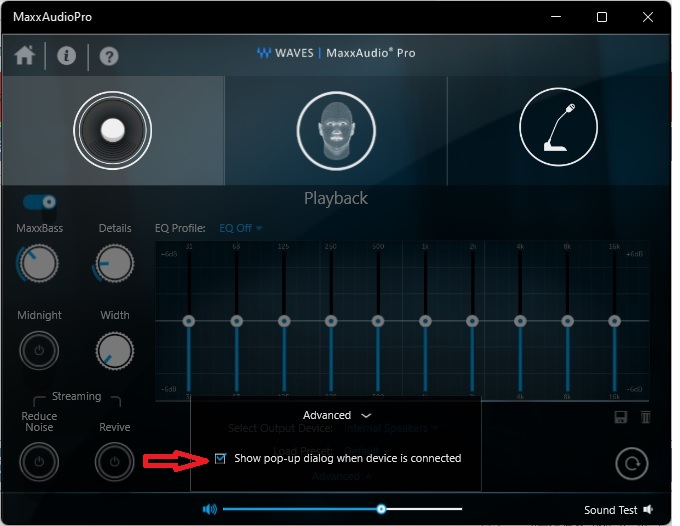
Finally realized the select popup had to come from somewhere and searched for apps that might be controlling the audio output. Found the MaxxAudioPro and under advanced settings there is a checkbox for dialog when devices are connected. It was unchecked. Enabling it restored audio to the headphones.
Original problem on an Optiplex but laptops also use the MaxxAudioPro so it’s not limited to a specific model.