Found this utility useful when troubleshooting a USB device that would fail on connection. Used it to find there was an error message associated with the current driver and replace the driver with a Windows compatible driver.
It can be downloaded from https://zadig.akeo.ie/. This is a stand alone executable so no installation but need to approve administrative access to run. The project is in Github. The user manual is at https://github.com/pbatard/libwdi/wiki/Zadig and contains a lot of background information as well.
The provider modem can be a problem if the network you want to connect to is behind another router downstream. Some have the option to set a passthru for VPN but not all. You can configure the modem as a bridge which disables the modem as a network controller. This may work for some cases but needs careful planning if you have an existing network using the default modem governed network.
I’ve found both Verizon and Comcast business modem/routers have a DMZ option which exposes one internal machine to the public network and this works to put the router on the external network interface. However, the T-mobile 5G home connection will not connect in this configuration even though Verizon home Fios and many others work just fine.
The best option I’ve found is to forward ports 500 and 4500 to the internal Edge X router. I found these using Wireshark. I’m sure they are documented somewhere. Port 500 is initially used when connecting to the Edgerouter thru the firewall but shifts to port 4500 after initial contact. Forwarding eliminates the killer conflict between T-Mobil and Comcast modems when using the Comcast option to expose an internal machine.
Background. Laptop with failed motherboard, no backup. User needed to recover a functional program to export data to new machine. System was Windows 11 home edition.
Turns out, it’s very easy to do as long as the user can recover the Bitlocker key from their MS account. Recovery cannot be done until the drive is unlocked and decrypted.
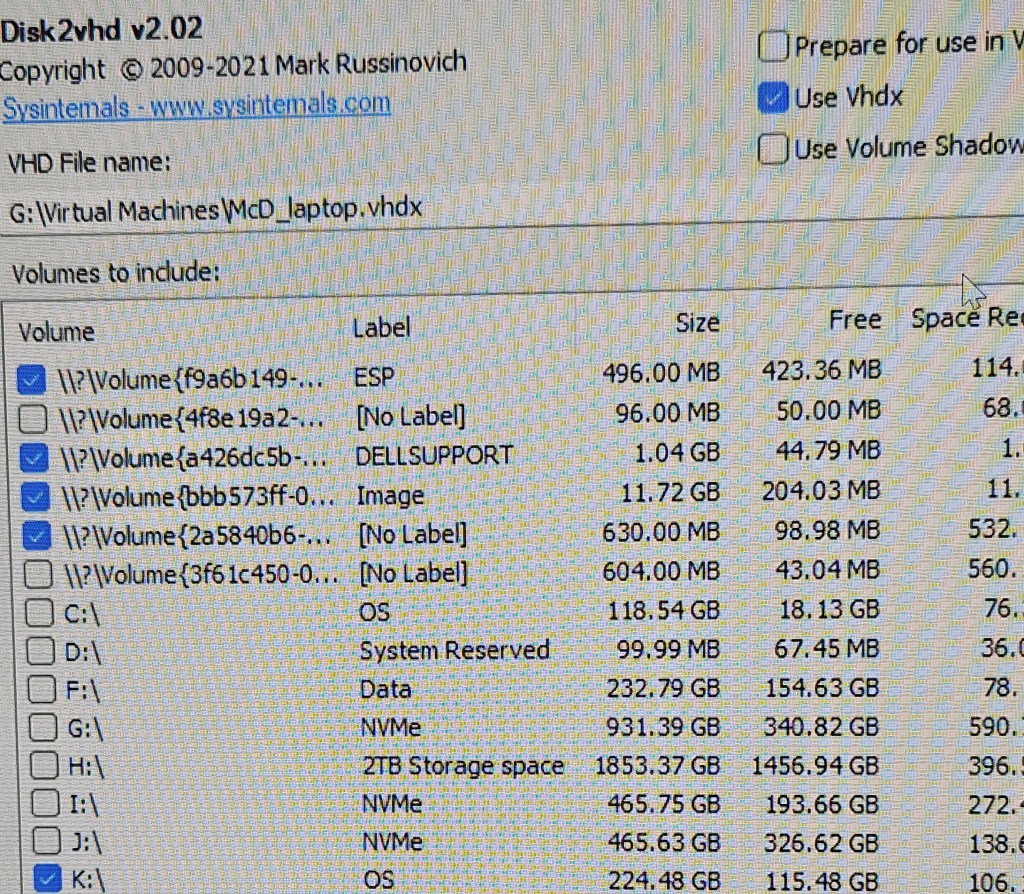
Use the disk2vhd utility from sysinternals to create the VHD from the drive. There is one problem not apparent until you actually mount the drive and start the process. There are system areas on the drive which also need to be copied to the same VHD but can be a pain to pick them out on the menu.
Easiest way to do the job is run the utility without the mounted external drive and get a list of all segments that exist in the machine doing the copying. Then exit the program, mount the disk to be copied and select all new entries.
Baseline
Select all new entries.
Once the VHD is created, open Hyper-V manager and create a new disk, gen-2 and mount the VHD as the drive. Select the new VM and start. The VM manager will install the needed drivers to fully boot the machine in Hyper-V. Patience. The pin login will be lost but the user can login using their MS account.
Until the VM is activated by the user login, the VM cannot be properly exported to create additional machines. The export function will work and create a file but it will fail on any attempt to restore it to any location.
Problem: USB drive formatted for use with an Ubuntu machine. I wanted to format the USB for reuse on a Windows 11 computer. One windows system would not mount the USB device and give an error message that the device needed to be formatted, however, any attempt at format failed. Should also note the device size was listed as unknown in the format wizard.
Earlier and on a different windows box, the USB device would mount but could not be formatted giving an error message that the device was read only. Made several attempts with different solutions found online but none worked. After these attempts, the other machine would not mount the drive.
After a lot of trial and error, it came down to 3 methods most likely to force a format: a registry edit, use diskpart to remove read only status and diskpart to format the drive. There are a couple of others which remove read only status: mechanical switch or disk properties available in windows explorer, but it the drive won’t mount, windows explorer is useless.
For the registry, you need to create a key. Computer\HKEY_LOCAL_MACHINE\SYSTEM\CurrentControlSet\Control\StorageDevicePolicies create a value in the key: writeprotect DWORD(32-bit) and set it to 0. This went smoothly but the USB still failed to format. Probably because the USB drive would not mount. Still got an error of unknown disk size in the formatting wizard.
DISKPART would recognize the device and list the size. So tried removing the read only property. Run DISKPART > list disk > select disk # > attributes disk clear readonly It returned success. However, still could not mount or format the disk. Same error message in the wizard box – unknown disk size.
Since DISKPART would recognize and determine the size, I then chose to format the disk directly in DISKPART. Run DISKPART > list disk > select disk # > clean > create partition primary > format fs=ntfs This is a full format, not a quick format, and is slow. Patience required to even see the first 1%. When the format is complete, windows explorer opens focused on the USB device. If the message in the formatting wizard is disk of unknown size, start with this.
Briefly an LED control program that can be installed on the 2 mentioned chips. Covered in many articles and YouTube videos. This is just a brief overview and mention of some specific problems encountered not otherwise well documented.
The most common method of installation is to use the WLED web site while the chip is connected to the computer via USB port. For the most part, this goes smoothly and the prompts will guide you to serial port drivers if any are needed and then configure wireless network connections.
For ESP32 chips, hold down the EN button before you connect and release it once the installation starts. I’ve seen posts and videos stating use the boot button. That also works but you have to be sure to hold it until it says erasing, not just installing.
Specific to the NodeMCU ESP8266, it may require you to download and install the CH340 driver before it can connect over the serial port. A reboot was not needed. There are other sources on line of the same driver but some don’t work. Other chips may require a different port driver or not need a driver. To get to the drivers, just select “No device found” on item 2. Apple laptop security won’t permit this file to install but, so far, it hasn’t been necessary to add it, the Apple laptop natively supported the chip connection. Twice I’ve had a Windows computer require the driver to be reinstalled after an update and reboot.
Once WLED is installed, you can set up a local wi-fi access point under config>wifi setup > scroll down to “configure access point”. For the access point to be available, select “Always” in the “AP opens” box. It shows as WLED-AP as default name in the list of wireless connection points. From here it gets a little confusing. Select it as your wi-fi service. If you are using an Android phone and the chip is connected via USB to a computer, when you select sign-in, no password is needed even if you set one. The sign-in dumps you directly into the control page. If the chip is not connected to a computer, a sign-in with password is needed. The default password is “wled1234”
Some cases I prefer to use only the WLED-AP for unit control. There is no encryption on passwords saved on the chip. If the unit is outside, it’s possible for someone to get the users home wi-fi password and SSID if the unit is stolen.
The WLED app works to connect to the chip on the same subnet. I have not had success in connecting across subnets. Even on the same subnet, the discover process may not work. Easiest to just enter the IP address taken from the “wifi setup” on the configuration page when you initially set up the access point.
There are other installers which can be used to install the binary and configure the wireless network later. I’ve used this when I want to have only the user’s wireless network configured on the chip since the password is stored unencrypted in the EEPROM or I want a different program installed. ESPEasyFlasher is specific for the ESP8266. Download the WLED binary and flash the chip. Exspressif has others for the ESP32 WLED. There is also ESPhome-flasher. Deprecated on Jul 3, 2023 but still good for this. Advantage of no fiddling with buttons and it will install any binary file, not limited to WLED.
The problem is created by having the enhanced view active in the Hyper-V connection to the VM. This may express several ways and may not occur in all situations. Does happen in Hyper-V consoles on Windows 10, 11, server 2019 and probably other server versions. In some cases there will be no enhanced view option available and there is no issue. In other cases, the option has to be deselected every time. This is new behavior as it started with VMs that have been working without a problem.
Image of login screen when enhanced session is enabled. This happens when you do a Quick Create. When you complete the login, there is just a blank screen. Other times, with existing VMs, you may get normal login screen that fails with a blank screen – next image.
Image of login screen when enhanced view is off. This will be successful. Sometimes you may get this screen with the Enhanced Session checked and it will go to a blank screen on login. Notice the option cannot be checked in this instance.
There are a bunch of settings in Win10/11 that need to be modified to connect to an EdgeRouter X which were covered in individual prior posts. I just had to setup 2 more machines and realized I need to collect them in one post. Here they are without background reference which can be found in earlier posts.
Problem
Just switched from Verizon to T-Mobile 5G internet connection and the VPN fails. Other users have Comcast or Verizon 5G and there is no problem. After a year of trying, T-mobile 5G does not permit user to make changes necessary to get it working.
Create VPN connection
In VPN properties, select Security tab. Under Allow These protocols, check CHAP and MS-CHAP v2
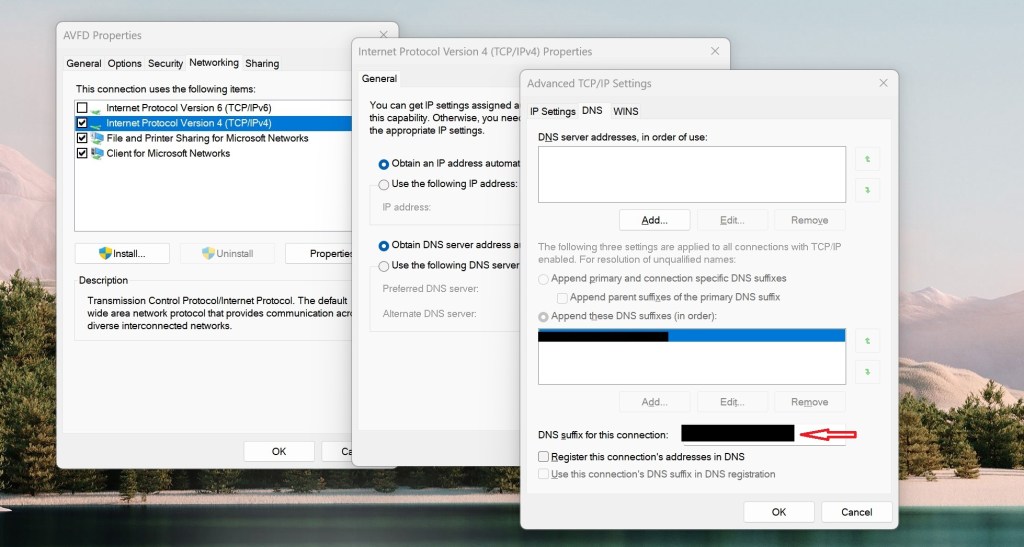
Also important, in the VPN properties, enter the domain suffix to use. If you don’t, the VPN will connect but get all sorts of errors. The telling one is if you try to browse a remote file, you get an error message stating you are not allowed to login from this location. Also, remote desktop connects to target but then quits instead of logging in.
Turn off UDP for client From command line as administrator or PowerShell as administrator run the following
Registry edit for Windows firewall REG ADD HKLM\SYSTEM\CurrentControlSet\Services\PolicyAgent /v AssumeUDPEncapsulationContextOnSendRule /t REG_DWORD /d 0x2 /f
Add FQDN for remote DNS lookup Search for and open Control Panel > Network and Sharing Center >Change Adapter Settings > select Ethernet connection (not VPN) & right click > select properties > select IPV4 > select properties > select advanced button > select DNS tab > select button ‘Append these DNS suffixes’ > select Add > enter the correct suffix for the remote domain.
Remote Gateway In the VPN network connection, under properties select the Networking tab, select IPv4 properties. General tab appears, select advanced, on IP settings make sure Use Default Gateway on Remote Network is checked. If unchecked it can cause DNS lookup problems to the remote computers depending on priority settings of the VPN vs. Ethernet connections. If you can find them by IP address but not name with this unchecked, priority settings are the issue. Split tunneling is the same as unchecking this box.
Set split tunneling Get-VPNConnection Look for SplitTunneling status: false by default Set-VPNConnection -Name “VPNname” -SplitTunneling $True Quotes around VPN name are required
If split tunneling is true, the remote gateway is not set. This causes problems with finding the remote computers. You can find them by IP address but not name. The fix for this while keeping split tunneling is to reduce the priority number for the VPN and increase it for the Ethernet connection. This forces name resolution to use the VPN DNS first then the external DNS if it can’t find the name locally. It works for browsing external web sites but seems to have occasional difficulty with ads on some pages slowing the response or failing to finish loading.
Just discovered there is an option to join 22.04 to Active Directory when installing the OS. This worked smoothly and allowed immediate access authenticating against AD. The DHCP server must hand out a DNS address that works to resolve the domain name. Very important in home setups. There is no option to enter a different DNS server during setup. If it can’t find the AD server, the install will continue but without AD authentication.
The initial login screen shows only the local admin account created during setup. You need to select “not listed” and enter user@domain.name. If you just do the domain user name without the extension, it fails. After the local account setup is done, the domain user will appear as an option on the login screen.
If you use Quick Create in Windows 10/11 Hyper-V to make an Ubuntu VM, there is no option to domain join; you have to AD join manually following creation of the VM. Personally, I find it easier to manually create a VM and use auto join during install.
Caution if creating a virtual machine in Hyper-V. Be sure to first create an external virtual switch and assign it when configuring the VM. The default VM network connection is internal and will not connect to the AD domain controller. However, the test for connection will pass during configuration because setup is using the host network. It will fail during actual implementation because the VM is using its assigned virtual network switch, not the host.
To check which DNS servers Ubuntu uses: nmcli dev show | grep DNS
The following is how to domain join after the OS is installed or if you are using an earlier version that 22.04.
Ran thru a bunch of instruction sets for authenticating to a domain and the one below worked the first time and easy to implement. You might want use a test virtual machine first as you can brick it but I did live on real hardware, no problem. However, there are 2 gotchas left out of the instructions: First, before starting, add the computer to be joined to Windows DNS otherwise you get a lot of messages saying computer not found while following the instructions. However, it will join and authenticate. Second, you need to enable and start the systemd.resolved service once you’ve finished joining. My machine could not connect to the internet or authenticate at the GUI until that was done; however, the SSH connection in the demo did work. No issues after restarting the service. I’m not sure if it’s even necessary to disable the service but that’s for later.
He does go thru the commands fast and it’s sometimes difficult to stop on the text plus the font is small and hard to read, so here are the basics. Check the video for explanations.
First install all the required packages. sudo apt -y install realmd libnss-sss libpam-sss sssd sssd-tools adcli samba-common-bin oddjob oddjob-mkhomedir packagekit
Next stop the local DNS resolution and verify. sudo systemctl disable systemd-resolved.service then stop – just replace disable with stop then status – replace stop with status
Set host name to match AD schema hostname.sub.domain.extension e.g. ubuntu1.internal.bogus.org
Configure DNS sudo nano /etc/resolv.conf replace nameserver 127.0.0.1 with nameserver AD DNS server address
Test DNS connection realm discover internal.bogus.org
Enter name of computer into AD DNS otherwise get error message “unable to resolve hostname.sub.domain.bogus.org” It will still connect but error messages continue the thru rest of the process.
Join AD sudo realm join -U someADadmin internal.bogus.org You’ll get a prompt for the password. No output when successful.
Check you have joined realm list
Halfway done. Now you have to allow users to authenticate against AD and create home directories
Update pam sudo pam-auth-update check box for “Create home directory on login”
restart sssd sudo systemctl restart sssd sudo systemctl status sssd
allow AD users to login to the computer sudo realm permit –all
See video on how to make domain admins local sudo holders
Enable and restart DNS resolution or you have problems reaching the network and logging in
logout AD login by selecting “not listed?” enter AD user in the form: user@internal.bogus.org Caution on AD usernames that start with numbers or anything other than a letter, these violate Ubuntu naming standards.
Well covered in several YouTube videos but there are a lot to choose from and many aren’t quite what is needed. Save search time. This one is the best of many I’ve watched and actually was able to use the instructions to configure and it worked the first time. Instructions for the firewall changes start at 7:30. The command line instructions are in the notes immediately under the video on the YouTube page. Config-tree GUI is good for updating the configuration when you add users.
Allowing VPN connection thru a router/modem.
The provider modem can be a problem if the network you want to connect to is behind another router downstream. Some have the option to set a passthru for VPN but not all. You can configure the modem as a bridge which disables the modem as a network controller. This may work for some cases but needs careful planning if you have an existing network using the default modem governed network. I’ve found both Verizon and Comcast routers have a DMZ option which exposes one internal machine to the public network and this works to put the router on the external network interface.
The best option I’ve found is to allow ports 500 and 4500 forwarding to the internal Edge X router. I found these using Wireshark. I’m sure they are documented somewhere. Only port 500 is used when connecting directly to the Edgerouter but forwarding thru the Comcast modem/router in between has the conversation shift to port 4500 after initial contact. Forwarding eliminates a killer conflict between T-Mobil and Comcast modems when using the Comcast option to expose an internal machine.
Win 10 VPN setup problems.
The wizard in the settings panel will setup the basic VPN connection but it omits an important setting that is accessed thru the control panel. However, the same setup on an Android device works immediately. There are 2 sites covering the same information. The YouTube is longer but explains more on how to access the setting. The web page is simple and to the point but has the additional registry change that is needed if you are behind a firewall at another location.
The second problem is that UDP responses aren’t handled properly in Windows 10. The result is the connection hesitates, locks up or slows down to the point of being useless. There is a registry edit to fix the issue. REG ADD “HKLM\software\policies\microsoft\windows nt\Terminal Services\Client” /v fClientDisableUDP /d 1 /t REG_DWORD This is covered in more detail in another post.