With VPN connectivity, remote desktop may not find computers by name but using the IP address works. This happens when your computer is not joined to the remote domain. Wireshark inspection of the DNS packets shows the query is for “desktop1.home” instead of “desktop1” you entered in the search box. Since the remoted DNS has no records for .home, it returns a not found response. Now it is necessary to use the full FQDN instead of just the name as you would on site. You can do that with each remote desktop session or change the default so you can just enter the machine name.
Controlled under the IPV4 settings on the Ethernet connection (not the VPN connection). Right click > select properties > select IPV4 > select properties > select advanced button > select DNS tab > select button ‘Append these DNS suffixes’ > select Add > enter the correct suffix for the remote domain.
Author: jmw0149
Windows 10 VPN suddenly stops working
There are many possible causes and most are routinely covered in help responses. However, sometimes it takes a deeper dive to find the root cause.
I encountered a problem that apparently was caused by a single event from software installation, OS upgrade or other random event that changed firewall settings and/or DNS settings. The firewall was apparently changed to block incoming L2TP ports. The firewall diagnosis came from a Microsoft expert. The conversation and data files for diagnosis are not online.
Port blocking: the symptom was the connection was attempted but nothing happened then the attempt timed out. One other symptom was the virtual Win10 hosted on the same machine could connect but not the host machine. That means the problem was localized to some setting on the host machine and not elsewhere in the network. Wireshark did not show any ISAKMP packets being sent by the host but captured those sent from the virtual machine.
A deeper look with logman showed ISAKMP packets generated but immediately blocked.
In admin mode at the command prompt
- command: logman start placeholder -ets -p Microsoft-Windows-WFP -o ikev2.etl
- try to connect to the VPN
- command: logman stop placeholder -ets
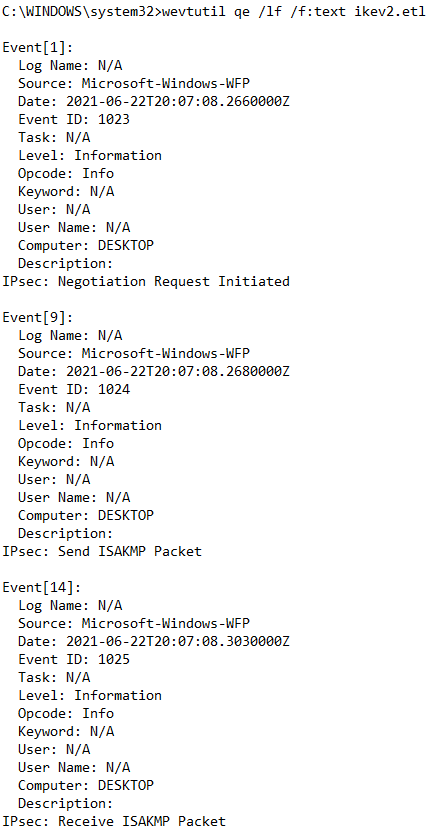
- command: wevtutil qe /lf /f:text ikev2.etl
- look for messages: “IPsec: Send ISAKMP Packet” and “IPsec: Receive ISAKMP Packet”
I never did find the specific rule causing the problem but worked around by adding a firewall rule to allow incoming L2TP UDP connectivity ports: 500, 1701 and 4500
The full text of the problem and logman commands I used to investigate this specific problem is at
https://docs.microsoft.com/en-us/answers/questions/111251/windows10-vpn-using-ipsecikev2-won39t-connect.html
Successful connection partial example. In the unsuccessful connection, no ISAKMP packets were sent.
Windows 10 RDP freezes over VPN
This is caused by UDP not working correctly. The solution is to turn of UDP for the RDP client. This problem may occur on some machines and not others even using the same VPN connection from the same remote site and each configured the same. There is a group policy setting to turn off UDP in RDP. However, it has no effect on the problem on the machines I’ve tested; it apparently works for some people but not all. To fix the problem, a registry edit was necessary. From command line as administrator or PowerShell as administrator run the following
REG ADD “HKLM\software\policies\microsoft\windows nt\Terminal Services\Client” /v fClientDisableUDP /d 1 /t REG_DWORD
Another setting that can affect quality of the image. In Remote Desktop > show options. On the experience tab, uncheck persistent bitmap caching. It helped to a small extent on freezing but did not cure the problem. However, the fact that it helped suggests this will improve performance.
The group policy setting that did not work for me, even after multiple reboots, but may for you. Computer Configuration > Administration Templates > Windows Components > Remote Desktop Services > Remote Desktop Connection Client. Double click the setting “Turn Off UDP On Client”. Choose Enabled option to enable this setting. Click Apply to apply the change.
The set of modifications for Windows 10/11 native VPN client to work are summarized at: https://jmwoccassionalnotes.blog/2022/10/09/configure-win10-11-client-for-native-vpn-connection/
Moving the Windows update software distribution folder
On a smaller primary drive, the saved downloaded files from previous updates can take up substantial disk space and interfere with major OS upgrades. Case in point is a recent Windows 10 feature update requiring 20 GB of free disk space with a minimum of 8GB free on the primary drive. In the MinisForum Z83 units we have, the SSD is 30 GB. Obviously the update cannot be installed without an additional drive.
Substantial space can be saved by moving the c:windowssoftwaredistribution folder to another drive. For this example we’ll use D:UpdateDownloadFolder. However, the permissions must also be moved to the new folder otherwise updates will fail. The alternative is to move it to an xFAT32 formatted disk and permissions are irrelevant.
There are 3 ways permissions can be moved: ICACLS, Get-ACL & Set-ACL, or robocopy. For some reason the first 2 do not work on our machines with the Intel Atom processor; they will reset the permissions to default, everyone full control, rather than update. The commands work on other machines with different processors. Also, it’s not a version issue as they fail on both the 1803 and 1903 versions on the Atom processor.
Moving the folder is simple but has a couple of gotchas. The log file may be open in a process and refuse to close even if you stop the windows update service. Simple fix is to disable the Windows Update service in service manager, which appears as WUAUSERV in task manager services list, then reboot. Remember to enable it when finished.
For robocopy the command is:
robocopy c:\windows\softwaredistribution d:\UpdateDownloadFolder /MIR /SEC.
If the log file is open, it will create the UpdateDownloadFolder then complain about an open file. You can use CTL-C to halt the copy. At this point, the base folder has the correct ACLs and there is no need to finish the copy process as update will create the subfolders as needed. However, you still have to close the open file in order to finish the redirect.
The get/set is very simple but it just doesn’t work in some instances. Create the new file then the command is:
Get-ACL c:windowssoftwaredistribution | Set-ACL d:UpdateDownloadFolder
ICACLS is a little tricky because of the folder name change.
Commands are:
ICACLS C:windowssoftwaredistribution /save c:moveacls.txt
The folder name has to be changed in the saved ACL file, then it will work. Open the file with text editor and change the file name from softwaredistribution to UpdateDownloadFolder.
ICACLS D: /restore moveacls.txt
Note: restore in the root directory. If you try to restore in the folder it will fail. The program is looking for the matching subdirectory in its header.
To check permissions on the new folder you can use:
ICACLS D:UpdateDownloadFolder | format-list
or
Get-ACL D:UpdateDownloadFolder | format-list
To finish the move, you need to rename the softwaredistribution folder to softwaredistribution.old then create a link to the new target directory. Use mklink which works only in Admin mode CMD prompt, not in Powershell.
The command is:
mklink /j C:\windows\softwaredistribution D:\UpdateDownloadFolder.
To remove the link, just delete it.
Test the change by checking for new updates. If permissions and links are not set correctly it will quickly fail. Once it’s successful, you can safely delete the C:windowssoftwaredistribution.old file.
Unifi EdgeRouter X VPN
20 April 2021
Well covered in several YouTube videos but there are a lot to choose from and many aren’t quite what is needed. Save search time. This one is the best of many I’ve watched and actually was able to use the instructions to configure and it worked the first time. Instructions for the firewall changes start at 7:30. The command line instructions are in the notes immediately under the video on the YouTube page. Config-tree GUI is good for updating the configuration when you add users.
Allowing VPN connection thru a router/modem.
The provider modem can be a problem if the network you want to connect to is behind another router downstream. Some have the option to set a passthru for VPN but not all. You can configure the modem as a bridge which disables the modem as a network controller. This may work for some cases but needs careful planning if you have an existing network using the default modem governed network. I’ve found both Verizon and Comcast routers have a DMZ option which exposes one internal machine to the public network and this works to put the router on the external network interface.
The best option I’ve found is to allow ports 500 and 4500 forwarding to the internal Edge X router. I found these using Wireshark. I’m sure they are documented somewhere. Only port 500 is used when connecting directly to the Edgerouter but forwarding thru the Comcast modem/router in between has the conversation shift to port 4500 after initial contact. Forwarding eliminates a killer conflict between T-Mobil and Comcast modems when using the Comcast option to expose an internal machine.
Win 10 VPN setup problems.
The wizard in the settings panel will setup the basic VPN connection but it omits an important setting that is accessed thru the control panel. However, the same setup on an Android device works immediately. There are 2 sites covering the same information. The YouTube is longer but explains more on how to access the setting. The web page is simple and to the point but has the additional registry change that is needed if you are behind a firewall at another location.
The second problem is that UDP responses aren’t handled properly in Windows 10. The result is the connection hesitates, locks up or slows down to the point of being useless. There is a registry edit to fix the issue.
REG ADD “HKLM\software\policies\microsoft\windows nt\Terminal Services\Client” /v fClientDisableUDP /d 1 /t REG_DWORD
This is covered in more detail in another post.
Summary of modifications for Windows native VPN client to work are posted at https://jmwoccassionalnotes.blog/2022/10/09/configure-win10-11-client-for-native-vpn-connection/
RDP to Ubuntu 18.0.4, 20.04, 22.04 and Raspberry Pi
The usual instructions to connect from Windows via RDP to Ubuntu failed on18.0.4. The problem is a dependency in a needed package has been broken in the installation of XRDP on Ubuntu. The fix is to install xorgxrdp manually but it is missing dependencies so you have to install xserver-xorg-core first. However, that also uninstalls some packages needed for mouse and cursor control in an RDP session so you add them back with xserver-xorg-input-all. After that, you can install xorgxrdp manually and the connection works.
The web page with write up on details is: https://c-nergy.be/blog/?p=13390
The broken dependencies in XRDP seem to have been corrected in the 20.04 install.
Still some flakey stuff about color scheme authorization when you connect but that’s more of a nuisance.
Update 1 Aug 2021
Found the web site which correctly address the color scheme authorization problem. I used it for Ubuntu 20.04 since I had the same problem with it as I did with 18.0.4.
Xrdp – Connect Ubuntu Linux Remote Desktop via RDP from Windows
One gottcha is you have to log out of Ubuntu before you attempt the remote desktop, otherwise all you get is a blank screen. Likewise logout of Ubuntu when exiting the RDP session, otherwise you get a blank screen when trying to login in to the physical box. Reboot is necessary to clear it. Might be a command line session you can do from putty but rebooting is quick and easy.
For Raspberry Pi, the process is much easier. Just install XRDP. The connection spawns a new window so you can have one window on the Raspberry Pi while working on a completely different window in the RPD session.
Update 2 Nov 2022
For Ubuntu 22.04 the problems have been addressed and installation is trivially easy.
Change to the root account for all commands to work.
sudo -i
install xrdp
apt install xrdp
Add xrdp to the certificate. Must be root to work.
usermod -a -G ssl-cert xrdp
Modify the firewall
ufw allow 3389/tcp
ufw allow 3389/udp
Logoff before trying RDP from windows. There will be 2 additional password authentications on connection to enable color pallet and color device management. This is for local users not AD users.
Active Directory authentication for RDP session
If the Ubuntu box is active directory domain joined for user authentication, the domain users cannot authenticate without some changes to the sssd.conf file.
sudo -i
cd /etc/sssd
nano sssd.conf
add 2 lines
ad_gpo_access_control = enforcing
ad_gpo_map_remote_interface = +xrdp-sesman
restart sssd
For domain user name use the full domain in the format
user@nameof.domain
Another option.
You can also go to settings, enable remote desktop, check enable legacy VNC protocol. This has slightly different login behavior with the authentication requests: one for color pallet and another for keyring unlock. However, the 2 procedures do not conflict and both can be active at the same time. You still get an xrdp login box under RDP.
I removed VNC and tried to connect with RDP and could not authenticate. RDP would not even connect to the remote machine unless I was logged in on the remote machine. This is xrdp behavior where you must be logged out to authenticate even though a connection can be made. From some posts, it appears this protocol is showing the same screen and the person logged in, not spawning a new one. After some more searching, this login failure appears to be a common problem with no definitive answer for now. Some people get it to work, others can’t.
Moving the Windows update software distribution folder
On a smaller primary drive, the saved downloaded files from previous updates can take up substantial disk space and interfere with major OS upgrades. Case in point is a recent Windows 10 feature update requiring 20 GB of free disk space with a minimum of 8GB free on the primary drive. In the MinisForum Z83 units we have, the SSD is 30 GB. Obviously the update cannot be installed without an additional drive.
Substantial space can be saved by moving the c:\windows\softwaredistribution folder to another drive. For this example we’ll use D:\UpdateDownloadFolder. However, the permissions must also be moved to the new folder otherwise updates will fail. The alternative is to move it to an xFAT32 formatted disk and permissions are irrelevant.
There are 3 ways permissions can be moved: ICACLS, Get-ACL & Set-ACL, or robocopy. For some reason the first 2 do not work on our machines with the Intel Atom processor; they will reset the permissions to default, everyone full control, rather than update. The commands work on other machines with different processors. Also, it’s not a version issue as they fail on both the 1803 and 1903 versions on the Atom processor.
Moving the folder is simple but has a couple of gotchas. The log file may be open in a process and refuse to close even if you stop the windows update service. Simple fix is to disable the Windows Update service in service manager, which appears as WUAUSERV in task manager services list, then reboot. Remember to enable it when finished.
For robocopy the command is:
robocopy c:\windows\softwaredistribution d:\UpdateDownloadFolder /MIR /SEC.
If the log file is open, it will create the UpdateDownloadFolder then complain about an open file. You can use CTL-C to halt the copy. At this point, the base folder has the correct ACLs and there is no need to finish the copy process as update will create the subfolders as needed. However, you still have to close the open file in order to finish the redirect.
The get/set is very simple but it just doesn’t work in some instances. Create the new file then the command is:
Get-ACL c:\windows\softwaredistribution | Set-ACL d:\UpdateDownloadFolder
ICACLS is a little tricky because of the folder name change.
Commands are:
ICACLS C:\windows\softwaredistribution /save c:\moveacls.txt
The folder name has to be changed in the saved ACL file, then it will work. Open the file with text editor and change the file name from softwaredistribution to UpdateDownloadFolder.
ICACLS D:\ /restore moveacls.txt
Note: restore in the root directory. If you try to restore in the folder it will fail. The program is looking for the matching subdirectory in its header.
To check permissions on the new folder you can use:
ICACLS D:\UpdateDownloadFolder | format-list
or
Get-ACL D:\UpdateDownloadFolder | format-list
To finish the move, you need to rename the softwaredistribution folder to softwaredistribution.old then create a link to the new target directory. Use mklink which works only in Admin mode CMD prompt, not in Powershell.
The command is:
mklink /j C:\windows\softwaredistribution D:\UpdateDownloadFolder.
To remove the link, just delete it.
Test the change by checking for new updates. If permissions and links are not set correctly it will quickly fail. Once it’s successful, you can safely delete the C:\windows\softwaredistribution.old file.
Windows server 2019 setup quirks
Ran into some issues when upgrading or installing a new 2019 server. Some of the problems are consistent, others may or may not happen.
Network – upgrade.
IPV4 settings are transferred but IPV4 protocol is not enabled on the NIC, only IPV6 is enabled. You have to manually enable IPV4 then it will work.
If it previously had remote desktop access, the firewall will block it. However, the firewall will show access is allowed when looking at permitted apps rather than advanced security. Run admin command line to enable remote desktop thru the firewall.
Enable-NetFirewallRule -DisplayGroup “Remote Desktop”
File and Printer sharing for Microsoft networks is turned off on the NIC. If the machine was a print server or file server, it will not function as such. All other file and print settings are retained in the upgrade so you only need to check the box and function is restored.
In a new install, the GUI activation for a MAK is broken and always returns an invalid key error. Probably the same in upgrade. You have to enter the key from the admin command console or Powershell using:
slmgr – ipk XXXXX-XXXXX-XXXXX-XXXXX-XXXXX
Hyper-v. The external connected virtual switches are changed to internal connection. I just created a new virtual switch with external connection and replaced the old ones.
Hyper-v. Virtual machines may not boot. Failing after a series of short multiple attempts. The problem is known and the work around is to change the MAC address on the virtual machine. If it’s dynamic, switch to static AND change the MAC address. Just 1 digit is enough. You can change back later.
How to setup a kiosk on a Raspberry Pi ver. 1.2 June 2022
This produces a full screen display of a web site that users cannot modify but Chrome is not in kiosk mode. This makes it easy for admins to remotely modify the display as things change.
These instructions are similar for the Ubuntu 18.0.4 OS. Some steps are easier since they are available from the GUI. A few changes need to be made though. The desktop needs to be changed to lightdm to reduce complexity of setting up a running X11VNC on startup. Automatic login on boot, adding startup programs and stopping the screen saver are available in the GUI. No need to start SSH; it’s already on. The chromium startup line also need the additional switch: --password-store=basic This bypasses an extra chromium login on startup.
When using an existing box, the chromium browser may not work properly for this on older versions of Jessie.
Update the OS and it’ll work as it should.
sudo apt-get update
sudo apt-get dist-upgrade
Install Raspbian OS from web site
Default is to boot into GUI desktop without using a password
Activate SSH connection
SSH has been deactivated by default since 2016
set keyboard layout to match your locale. Default is UK. This can cause problems with passwords having a special character when trying to connect with putty. Get access denied because passwords don’t match as the keyboards are not mapped the same. Found out the hard way.
——————————————————————————————————————————–
Permanently disable screen blanking, allow SSH, disable built in VNC
Now controlled under raspi-config app in terminal mode
or
from GUI select preferences>Raspberry Pi configuration.
Blanking: Select display tab and turn off screen blanking
SSH: Select interfaces tap and activate
VNC: Make sure it is not turned on.
check that SSH is active netstat -lt
SSH port will show in list if it’s active.
——————————————————————————————————————————
Install and configure the x11 VNC.
This shows the active GUI instead of spawning a new one. You can see the changes that will appear on the display screen. This allows you to use ctl + or ctl – to change font size and leave it set when you disconnect.
RealVNC server is installed on the raspberry pi and turned off by default. Do not turn it on. Doing so will result is multiple competing processes and you will be unable to connect.
I used UltraVNC to connect from the windows machine. It does not require a vendor account and email address.
https://www.megaleecher.net/Raspberry_Pi_VNC_Setup
sudo apt install x11vnc
Configure autostart for VNC in: /home/[user]/.config/autostart/x11vnc.desktop
create the file and directory if it does not exist
File contents:
[Desktop Entry]
Encoding=UTF-8
Type=Application
Name=X11VNCx11
Exec=x11vnc -forever -usepw
StartupNotify=false
Terminal=false
Hidden=false
additional line to prevent errors at startup. Sometimes the browser starts before the network is finished configuring so you get errors in connection. I haven’t seen it in the latest OS version but has happened in the past
X-GNOME-Autostart-Delay=3
Create password for remote session. This is separate from the user login password, but the same password can be used in both.
x11vnc -storepasswd
reboot to start x11vnc
Set the browser to open full screen when the system boots into the GUI. Incognito mode is needed because of the way some web sites change between modes. Failure to go incognito may prompt for a user response.
Use systemd autostart configuration for the browser.
cd ~/.config/autostart
sudo nano browser.desktop
[Desktop Entry]
Type=Application
Name=browser
Exec=/usr/bin/chromium-browser --start-fullscreen --incognito http://yoursite
Note: some browsers display the double hyphen as a single dash.
Check https://peter.sh/experiments/chromium-command-line-switches/ for correct style if in doubt
To display a web page with mixed secure and unsecure content.
add the switch. --allow-running-insecure-content
Note: Advanced settings in chrome allow mixing secure and unsecure content from specific websites. Privacy and Security > Site Settings > Additional content settings > Insecure content > Allow > add
However, this is not applied when starting from a command line in the autostart
You can now disconnect the keyboard and mouse. The unit will boot into a full screen display of the web site and the users cannot modify the settings. You can remote in and change the display easily. Patience on startup. The web site may take 30 seconds to appear and fully display. Usually less but it varies by website.
———————————————————————————————————————————Allow remote user to reboot the display
Create user account; I use reset as the user name.
In /etc/sudoers.d create a file with the following line. File name doesn’t matter; I use reset-display.
reset ALL=NOPASSWD: /sbin/rebootThis allows the named user to run the reboot command without sudo privileges.
To do it remotely from a windows environment, install Putty and use the Plink utility to send the reboot command to the box.
plink reset@192.168.1.100 -pw password sudo reboot
sudo will run without an admin password because of the file created in sudoers.d
Include it in a .bat file with an exit command and you can just double click to reboot the box.
The password is in clear text but it’s not an issue in our environment.
Other resources
https://en.wikipedia.org/wiki/Google_Chrome_version_history
https://peter.sh/experiments/chromium-command-line-switches/
——————————————————————————————————————————————————————————————————————————————————————————————————————————————————————————————-
